
How To Give An Intramuscular Injection
What is an intramuscular (IM) injection?
An intramuscular injection is a “shot” of medicine given into a muscle. A syringe (suh-RINJ) with medicine in it, is attached to a needle. The needle goes through the skin and into a muscle. The medicine is pushed into the muscle by pressing on the syringe plunger. When the medicine has been pushed into the muscle, the needle is removed
Why did my caregiver choose this kind of shot?
Your caregiver has chosen this kind of shot because of one or more of these reasons:
- The amount of medicine to be given.
- The kind of medicine to be given. Certain medicines must be given into a muscle.
- The medicine needs to be fast acting.
What should I know about the syringe?
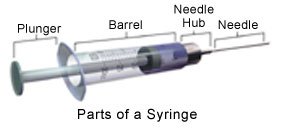
- A syringe has 3 major parts: the needle, the barrel, and the plunger. The needle goes into the muscle to put in medicine. The barrel holds the medicine. The plunger is used to get medicine into and out of the syringe.
- The syringe has marks on the side of the barrel like a ruler. Instead of inches, the markings are in cc’s or ml’s with marks between for fractions of cc's or ml's. Each cc will have a number (1, 2, 3) next to the correct marking. On some syringes the half cc will also be marked.
What should I know about the medicine?
- Always know the name of your medicine and why you need to take it. Know how much medicine you need to take or give. If you have questions about your medicine ask your caregiver before taking it.
- Medicine given in a shot is measured in cc’s (cubic centimeters) or ml’s (milliliters). A cc is the same amount of liquid as an ml. They are the same measurement with different names.
- Look carefully at the ampule or vial containing the medicine. Check to make sure 4 things are there:
- The name of the medicine.
- The number of cc’s or ml’s in the vial or ampule. (Make sure you have enough medicine for several doses.)
- The amount of medicine in each cc or ml.
- The last date the medicine is safe to use. This is called the expiration (x-per-A-shun) date.
- The name of the medicine.
How will I know the medicine is safe to give?
Check the ampule or vial to make sure:
- The medicine is not out of date. The expiration date will be on the bottle.
- There are no crystals or lumps in the ampule or vial.
- The medicine is the correct color. Ask your caregiver or pharmacist what color the medicine is should be.
- The name of the medicine is the same name your caregiver told you or wrote down. If you are not sure, call your caregiver.
How do I get the medicine out of an ampule?
First, wash your hands carefully with soap and dry them completely. Put on gloves if you need them.
- An ampule is a tiny bottle with a narrow neck and a long, thin, hollow top.
- The ampule may be scored to make it easier to break.
- The ampule may be colored or clear.
- If the ampule is either a dark color or is clear with clear medicine, it is hard to see the medicine inside. This is important because the hollow top of the ampule can trap enough medicine to keep you from getting the correct dose.
- You may not take medicine out of the top of the ampule after it is broken. You need to make the medicine go into the bottom of the ampule before you break it. To make the medicine go from the top of the ampule to the bottom, flick or snap the top with your finger. You may have to flick it a few times.
- If the ampule is either a dark color or is clear with clear medicine, it is hard to see the medicine inside. This is important because the hollow top of the ampule can trap enough medicine to keep you from getting the correct dose.
- To break the ampule, wrap a wet alcohol wipe completely around the neck of the ampule. Hold the top and the wrapped neck with the fingers of your writing hand, and the bottom with the fingers of your other hand. Break the ampule.
- Put the bottom of the ampule on a flat surface.
- Take the cap off the syringe by pulling it straight off.
- Carefully aim the needle through the broken neck of the ampule into the liquid in the bottom.
- Pull back on the plunger to suck the medicine into the syringe.
- Once the syringe has the medicine in it, turn it upside down so the needle is pointed straight up and the plunger is below it.
- Pull down on the plunger until you see that the needle and a small area at the top have no medicine. If necessary flick the side of the barrel to make any air bubbles rise to the top of the barrel.
- Push up on the plunger to the correct marking. This will make some medicine squirt out of the needle. It will also force all the air out of the syringe.
How do I get the medicine out of a vial?
A vial is a small bottle with a plastic or metal top covering a rubber stopper. The vial may hold enough medicine for several doses or only one dose. The medicine may be liquid or powder. If the vial is a multiple dose vial, make sure you write the date you opened it on the label.
- If the medicine is a powder, it has to be made into a liquid:
- Your caregiver will order the correct sterile liquid to add to the powder. There are only two kinds of sterile liquids that may be used: sterile saline and sterile distilled water. They are packaged in vials with metal or plastic tops covering a rubber stopper. Use only the liquid that your caregiver provided or ordered. If you were told to use sterile saline, you may not use sterile distilled water. If you were told to use sterile distilled water you may not use sterile saline. Never use tap water.
- Remove a syringe from its wrapper. If you need to add more than 3 cc’s of liquid, you will need to use 2 syringes. The first syringe is needed to add the sterile liquid. The second syringe is needed to give the shot.
- If you have instructions from your caregiver, follow them. If you do not have instructions from your caregiver, read the label or package insert information. It will tell you how much liquid you will need to add to the powder to make the correct solution.
- Take the metal or plastic top off the sterile saline or sterile distilled water vial. Do not take the rubber stopper off.
- Wipe the top of the vial containing the sterile liquid you will use to dilute the powder with an alcohol wipe.
- Also wipe the top of the vial with the medicine as a powder in it. Do not touch the tops of the vials after wiping them.
- Your caregiver will order the correct sterile liquid to add to the powder. There are only two kinds of sterile liquids that may be used: sterile saline and sterile distilled water. They are packaged in vials with metal or plastic tops covering a rubber stopper. Use only the liquid that your caregiver provided or ordered. If you were told to use sterile saline, you may not use sterile distilled water. If you were told to use sterile distilled water you may not use sterile saline. Never use tap water.
- Insert the needle into the top of the vial with the powder and pull back the plunger to take air from the bottle. Take the same amount of air as the number of cc’s of liquid you will add to the powder. You may have to pull back harder on the syringe than you expect.
- Remove the needle from the vial with the medicine. Stick the needle into the top of the vial with the sterile liquid. Push down on the plunger to inject the air into the sterile liquid vial.
- Turn the vial attached to the syringe upside down. The sterile liquid will come back to about the same amount as the air you put in. Adjust the amount if necessary.
- Remove the needle from the sterile liquid bottle.
- Stick the needle into the vial with the medicine and push the plunger all the way down. The liquid should go in easily.
- With the needle still in the vial, push it up to the hub. You do this so you cannot touch the sterile needle. Gently mix the liquid and the powder into a solution.
- If you see powder in the vial, keep mixing until you see only liquid.
- If you needed to use a large syringe to add liquid, remove the needle and follow the directions below: “If the medicine is already a liquid”.
- You may use the same syringe to prepare medicine and give the shot. If so, turn the medicine and the syringe upside down.
- Pull the needle down so the tip is in the medicine.
- Pull the plunger back to the correct marking on the syringe barrel for the dose.
- When you have the correct amount of medicine in the syringe, remove the needle and put the cover back carefully over the needle.
- If the medicine is already a liquid:
- Do not use any medicine that has crystals or lumps in the vial.
- Ask your caregiver or pharmacist what color the medicine should be. Do not give a medicine that is not the correct color.
- You need to add air to the vial in the same amount that you plan to take out in order to get the medicine out of the vial. To do this, you need to know how much medicine to inject.
- Pull the plunger back to the amount you plan to give. Remove the plastic or metal top of the vial, if it is still in place, and clean the rubber stopper with an alcohol wipe.
- Insert the needle into the vial and push down on the plunger.
- Once the air has been pushed into the vial, turn the vial, attached to the syringe, upside down. Make sure the tip of the needle remains below the level of the medicine. The medicine will come back into the syringe and stop at or near the correct place.
- When you have the correct amount of medicine in the syringe, remove the needle and carefully put the cover back over the needle.
- Do not use any medicine that has crystals or lumps in the vial.
Things that may go wrong:
- If you put in too much air, the plunger will be difficult to push.
- If you don’t put in enough air, the plunger will be difficult to pull.
- If you are using a multiple dose vial, too much or too little air may have been put in for a previous dose. If so, you will have to adjust the pull or push on the plunger.
Where can I give an IM shot?
The skin, and the muscles under the skin, cover nerves, blood vessels, and bones. It is important to give a shot where you will not hurt any of these body parts. There are 8 possible areas, 4 on each side of the body, where an IM shot can be given. It is important to choose the correct area. If caregivers showed you what areas are safe, follow their directions. Change the areas where you give shots. If you give a shot in the same place every day or even every week, scar tissue can build up. The scar tissue will affect how the medicine will work. Following is information about the safe areas to give a shot.
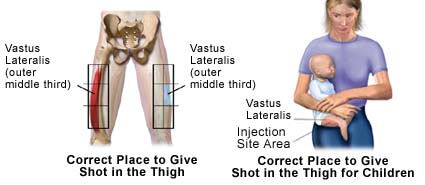
- Vastus Lateralis (VAS-tuss lat-er-AL-iss) Muscle (Thigh): The thigh is used often for children, especially children under 3. It is also a good place for an adult. The thigh area is especially useful if you need to give yourself a shot because it is easy to see.
- Look at the thigh that will get the shot. In your mind, divide the thigh (the area between the knee and the hip) into three equal parts. The middle third is where the shot will go.
- This muscle is called the vastus lateralis. It runs along the top of the thigh (the front) and a little to the outside. Put your thumb in the middle of the top of the thigh, and your fingers along the side. The muscle you feel between them is the vastus lateralis.
- Look at the thigh that will get the shot. In your mind, divide the thigh (the area between the knee and the hip) into three equal parts. The middle third is where the shot will go.
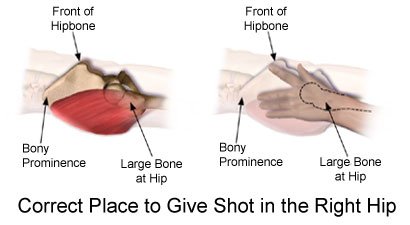
- Ventrogluteal (ven-trow-GLUE-tee-ull) Muscle (Hip): The hip is an area with good bone landmarks and very little danger of hitting blood vessels or nerves. It is a good place for a shot for adults and children over 7 months old. The person getting the shot should be lying in his or her side.
- To find the correct place to give a shot in the hip to another person: Place the heel of your hand on the hip bone at the top of the thigh. Your wrist will be in line with the person's thigh. Point your thumb at the groin, fingers point to the person’s head. Form a “V” with your fingers by opening a space between your pointer finger and the other three fingers. Your little finger and ring finger will feel the edge of a bone along the fingertips. The place to give the shot is in the middle of the V-shaped triangle.
- To find the correct place to give a shot in the hip to another person: Place the heel of your hand on the hip bone at the top of the thigh. Your wrist will be in line with the person's thigh. Point your thumb at the groin, fingers point to the person’s head. Form a “V” with your fingers by opening a space between your pointer finger and the other three fingers. Your little finger and ring finger will feel the edge of a bone along the fingertips. The place to give the shot is in the middle of the V-shaped triangle.
- Deltoid (DEL-toyd) Muscle (Upper arm muscle): The person getting the shot can be sitting, standing or lying down. Start with a completely exposed upper arm. You will give the shot in the center of an upside down triangle. Feel for the bone that goes across the top of the upper arm. This bone is called the acromion process. The bottom of it will form the base of the triangle. The point of the triangle is directly below the middle of the base at about the level of the armpit. The correct area to give a shot is in the center of the triangle, 1 to 2 inches (2.5 to 5 cm) below the bottom of the acromion process.
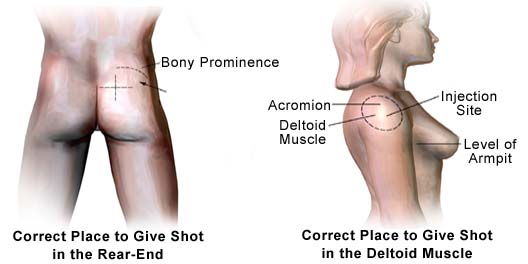
- Dorsogluteal (door-so-GLUE-tee-ull) Muscle (rear-end): The upper rear end area is the area where most people have gotten shots. Expose one entire cheek of the rear-end. With an alcohol wipe draw a line from the top of the crack between the cheeks to the side of the body. Starting in the middle of the same side, draw another line across the first one with the alcohol wipe. Start from about 3 inches above the first line to about half way down the middle of the cheek. You should have drawn a cross. In the upper outer square you will feel a curved bone. The shot will go in the upper outer square below the curved bone.
How do I choose the best muscle for the shot?
If your caregivers have told you which muscle to use, follow their directions. Muscles change with age. For example, the rear-end area is never used for infants or children under 3 years old because it is not developed well enough. The deltoid may work well for a person with developed muscles in the upper body. The deltoid cannot be used if that area is very thin or underused. The muscle must be easy to reach.
What items do I need to give a shot?
- One alcohol wipe wrapped in foil.
- One sterile dry 2x2 in a paper wrapper.
- An ampule or vial containing the medicine.
- The correct size needle and syringe. Your caregiver should give you this information.
- You may want to use gloves for your protection or the protection of the person getting the shot.
How do I inject medicine into a muscle?
Please read this entire section before giving the shot. It is important to get a general idea of what you are about to do before beginning. Read the step-by-step procedure again as you do it.
- Wash your hands carefully with soap and dry them completely. Put on gloves if necessary. Open the foil covering the first alcohol wipe.
- Take the cover off the needle by holding the syringe with your writing hand and pulling on the cover with your other hand. It is like taking a cap off a pen.
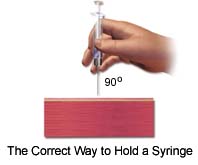
- Hold the syringe in the hand you use to write. Place the syringe under your thumb and first finger. Let the barrel of the syringe rest on your second finger. Many people hold a pen this way when they write.
- Wipe the area where the needle will go with the alcohol wipe. Let the area dry.
- Depress and pull the skin a little with your free hand. Keep holding the skin a little to the side of where you plan to put the needle.
- Use your wrist to inject the needle at a 90 degree needle (straight in). The action is like shooting a dart. Do not push the needle in. Do not throw the needle in, either. Throwing the needle will make a bruise. The needle is sharp and it will go through the skin easily when your wrist action is correct.
- Let go of the skin. The needle will want to jerk sideways. As you let go of the skin, hold the syringe so it stays pointed straight in.
- Pull back on the plunger just a little to make sure you aren’t in a blood vessel. (If blood comes back, remove the needle immediately. Do not inject the medicine. If this happens, dispose of both the syringe and the medicine. Get more medicine in a new syringe. When you give the second shot give it on the other side.) Pulling back on the plunger is easier said than done. Use your other hand to pull back on the plunger while keeping the syringe in the straight up position. It will feel clumsy at first.
- Push down on the plunger and inject the medicine. Do not force the medicine by pushing hard on the plunger. Some medicines hurt. They will hurt more if the medicine goes in quickly.
- After all the medicine is injected, pull the needle out quickly at the same angle it went in.
- Use the dry sterile gauze 2x2 to press gently on the place where the needle went in.
How can I get rid of used syringes and needles?
Your caregiver may have given you a hard plastic container made especially for used syringes and needles. If you were not given this kind of container, you will need to look around your home for a hard plastic container with a screw-on top such as clothes softener bottle or a hard plastic detergent bottle for washing clothes. Make sure you can put both the syringe and the needle into the container easily. Whatever container you choose, make sure that the needles cannot break through the sides, bottom or top. Call your caregiver or a pharmacy to find out what your state or local requirements are for getting rid of used syringes and needles.
Click down for more images and videos.......
No comments:
Post a Comment